Zendesk SMS Integration
Image how much more efficient your support service could become if you could monitor progress of support tickets by integrating SMS. There are a number of options to integrate the Zendesk system with Esendex in order to send automated SMS triggered by specific actions or events during the life cycle of support tickets. At present these include SMS which:
- Notify requester of a received request
- Notify requester of a comment update
- Notify assignee of a comment update
- Notify assignee of an assignment
- Notify assignee of a reopened ticket
- Notify group of an assignment
- Notify all agents of a received request
The Esendex Zendesk integration for automated SMS, like any of the above, is a simple three step process:
- Set up your Free Esendex account
- Tell Zendesk how to send the SMS messages
- Tell Zendesk when to send the SMS notifications
How to configure Zendesk to send automated SMS notifications
Setup Zendesk to send SMS notifications
A little configuration is required in order for the Zendesk system to send SMS notifications.
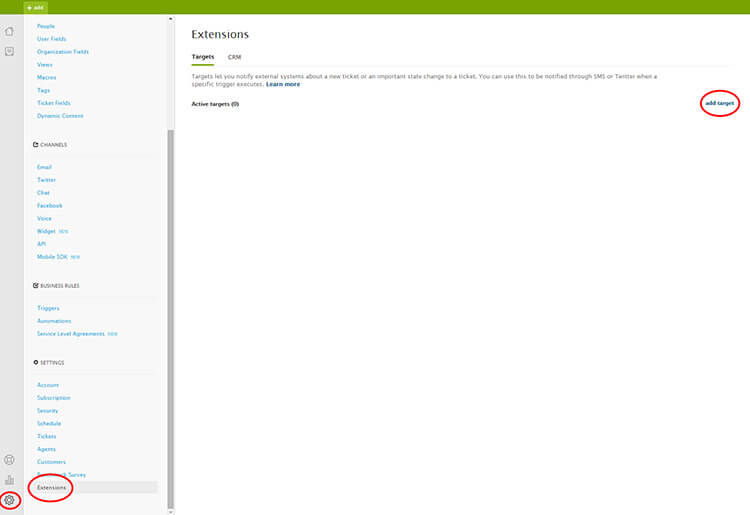
First you’ll need to log in to your Zendesk account. Once logged in, navigate to Settings (which can be accessed through the cog in the bottom left) then go to “Extensions” and click “add target” in the top right.
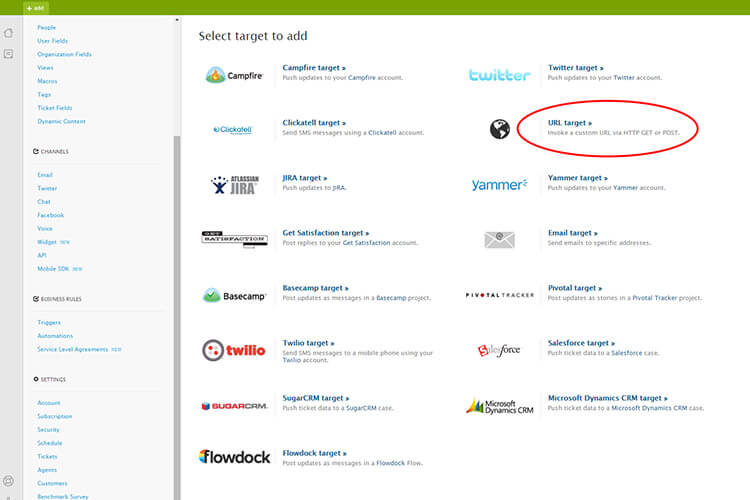
This should bring you to the screen above. Select the “URL target” option to continue.
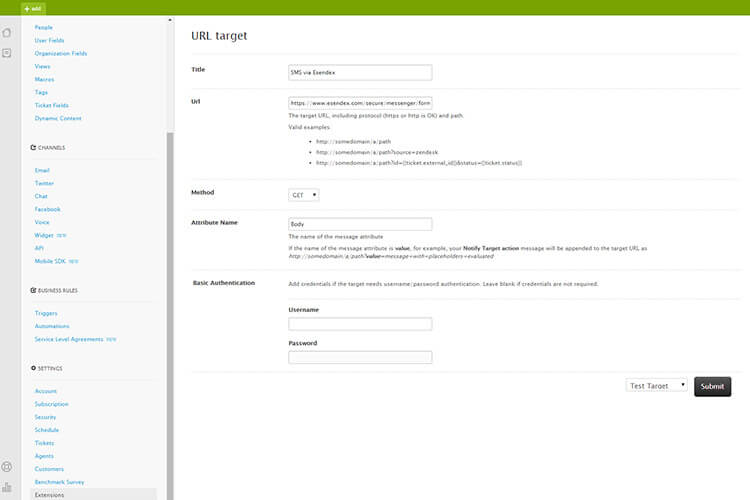
This will then bring up the interface above. You will need to enter the required information in order to configure the set up for SMS sending from Zendesk.
Here are the information you’ll need:
- Title – this can be anything, try and pick something meaningful to you e.g. SMS via Esendex
- URL – this must have a particular format which should replicate the format given below
- Method – GET
- Attribute Name – Body
- Basic Authentication – leave blank
The URL should take the following format:
https://www.esendex.com/secure/messenger/formpost/SendSMS.aspx?Username=esendexusername&Password=esendexpassword&Account=esendexaccountreference&Recipient=mobilenumber
For the URL formatting you will need to replace esendexusername with your esendex username (email), esendexpassword with your esendex password, esendexaccountreference with your esendex account reference and finally mobilenumber with the mobile number you wish to receive the SMS.
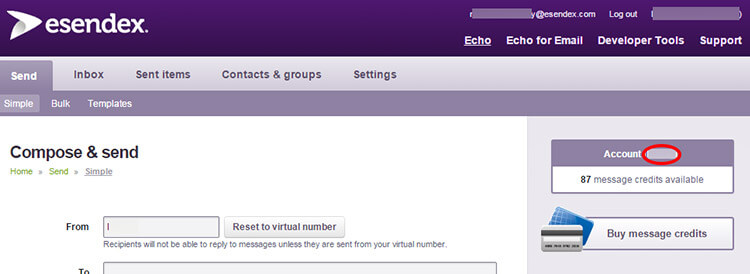
You can find your Esendex account reference at the welcome email received with your initial sign up. Alternarively you can log in to your echo account and find it on the welcome interface as shown below. It will look something like this: EX0000001.
Once you’ve completed all the information, you can test if the configuration is successful or not by hitting the “submit” button on the Zendesk configuration screen with the “Test Target” selected in the drop down.
If the configuration is successful you should receive a text message with information from Zendesk which should follow shortly after.
The final step is to alter the target dropdown to “Create Target” and hit “submit.”
Tell Zendesk what events or actions should trigger the SMS send
Now you’ll need to tell your Zendesk software when to send the required SMS notifications. To do this you will need to integrate Zendesk with the desired event(s).
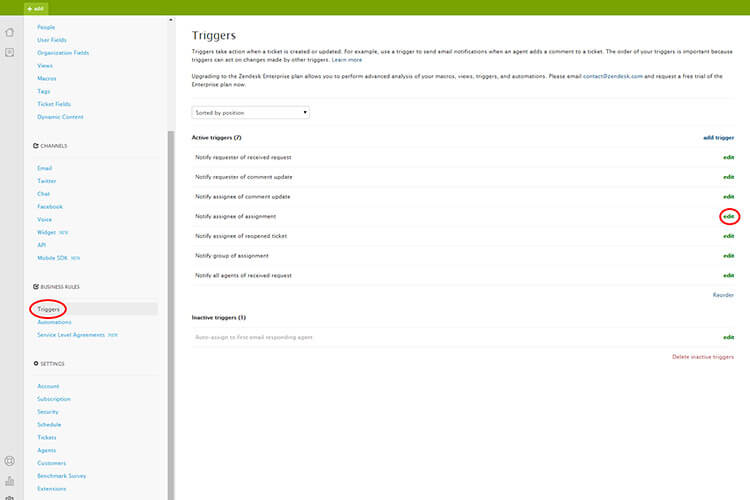
To do so once again you’ll need to log in to your Zendesk account and navigate to Settings (this is accessed through the cog in the bottom left),then click “Triggers”.
Here you will see a list of the events available in Zendesk for you to choose from. For this example we will be hooking into the “Notify assignee of assignment” event. To do this click “edit” next to the desired event.
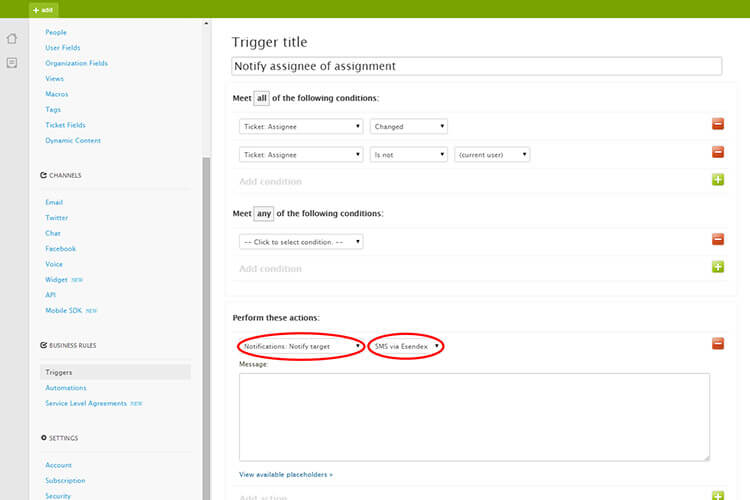
You will then be brought to the trigger screen. To set this specific event to be the trigger that send out SMS notifications there are two fields you must change.
- First you will need to change the action to be performed to “Notifications: Notify target”. This should then automatically keep the “SMS via Esendex” target we configured earlier selected. If not select it from the drop down menu.
- Then you will need to write up the content of the SMS to be sent, then hit “submit”
Other configuration options to send SMS from Zendesk
If you wish to send SMS notifications to multiple member of your support team but only when they are assigned a ticket you can do that in Zendesk.
Simply set up a target in the extensions menu for each of your users. Name each user or mobile number to make it easier to distinguish and manage later. And remember to check that you have put the correct mobile number for each user in the URLfield.
Then all you have to do is to set up the SMS trigger for each user you want them to receive a text message about.
You can even edit this to have the trigger only happens when the assignee is a specific user.
For example: In the case of setting something up for Debby you would need the condition “Ticket: Assignee” “Is” “Debby”. Then setup the action to notify target and select “Debby SMS” from the options. Then hit submit.
Repeat this process for each user that you want to be notified via SMS.
To find out more , simply contact us.
Start your FREE trial
25 free messages. 7 days. Sign up in 30 seconds.
No credit card required.
We’re sorry – there was a problem with your signup. Please call 1300 764 946.
Your data is safe with us. Review our full privacy policy.